Friday, January 11, 2019

Golden Globes 2019: The Best Beauty Looks

The 2019 Golden Globe Awards was full of surprises and upsets. But if there’s one thing more interesting about the ceremony itself, it’s when the celebrities arrive on the red carpet in their show-stopping gowns and stunning hair ‘dos and makeup.

Check out our red carpet favorites below!

Lucy Boynton Hair Color Formula

COLOR

To achieve Lucy Boynton’s hair color, start by using the O&M Paint Powder Clay Lightener and O&M CØR.color 40 vol Activator to lighten from roots to ends. Then, apply a base color of O&M CØR.color 9.1 Very Light Ash Blonde and O&M CØR.color 10 vol Activator on her roots of to give depth and a very softly shaded effect. Shampoo then apply a toner of O&M CØR.color 10.8 Lightest Pearl Blonde all over the hair with a semi-activator. Let this process for 20 minutes, then shampoo and treat the hair with O&M Seven Day Miracle Moisture Masque. The coconut in this product will add extra nourishment to the hair.

lucy-boynton-hair-color-golden-globes

Source: Celeb Mafia

STYLE

Place O&M Know Knott Detangling Spray into damp hair, then blast the hair dry without using any brushes until it’s about 80% dry. Then place liberal amounts of our sea salt spray O&M Surf Bomb Sea Salt Texture Spray through the hair to create volume and texture. Please note that Surf Bomb is designed to give a more matte gritty appearance. This is not a shiny product. From there, create a center part using a large barrel iron, giving the hair a small S wave and keeping the ends straight. Allow the hair to cool down. Finally, spray O&M Original Queenie Firm Hold Hair Spray to set the style. To soften the curls and create the fullness, use a wide tooth basin comb.

Thandie Newton Hair Color Formula

thandie-newton-hair-style-golden-globes

Source: Elle.com/Frazer Harrison

COLOR

For Thandie Newton’s hair color, use a back to back semi-permanent formula to layer the depth and glaze her hair. Use O&M CØR.color 4.0 Brown with a O&M CØR.color 5 vol Activator onto damp hair. Then, shampoo hair and use half 4.0 and half O&M CØR.color 0.00 Clear as our final color. This will give depth and incredible shine. Detox the hair then use O&M The Power Base Protein Treatment. Power Base is a mixture of both protein and moisture which is fantastic for curly coarse hair.

STYLE

Begin by layering O&M Know Knott Detangling Spray and O&M Frizzy Logic Finishing Shine Spray onto damp hair and dry until 80% of the moisture is out of the hair. Then, place O&M Frizzy Logic Shine Serum through the hair and smooth with a natural bristle brown brush to make the hair smooth from roots to ends. Starting at the nape, take an inch-wide section. Using a small curling wand, create curls all around the barrel, forming a tight S shape from roots to ends. Continue this all the way up the hair, then allow to cool. Next, brush the hair gently with a large tooth comb to release the curl. Using your O&M Detangler Hair Brush, break the curls up to create a soft wide triangular Afro effect. Finish the style with O&M Frizzy Logic Finishing Shine Spray to settle any frizzy and impart an amazing shine onto the hair.

Lady Gaga Hair Color Formula

COLOR

Do on-scalp lightening using O&M Ammonia Free Keratin Powder Lightener for 50 minutes. Then, do mid-length to ends cleanse using O&M Ammonia Free Keratin Powder Lightener, O&M Original Detox Shampoo and water. Then use O&M CØR.color 10.6 Lightest Violet Blonde onto damp hair to tone and remove unwanted warmth from the hair. To achieve the blue glaze through the hair, mix 30g of O&M CØR.color 0.00 Clear with 1g of O&M Mineral.CCT 0/88 Blue Tone Booster with O&M CØR.color 3.5 vol Activator. Paint this through the hair on the crown, nape and hairline. Then, emulsify through like a shampoo to give a blue rinse like effect. Shampoo and condition, then the hair is ready to style.

lady-gaga-hair-style-golden-globes

Source: Elle.com/Getty Images

STYLE

Apply a mixture of O&M Atonic Hair Thickening Spritz and O&M Know Knott Detangling Spray through the hair then finger-dry to 100%, smoothing the hair using a Denman Brush. Then, apply O&M Style Guru Styling Cream through the hair and dry again using a Denman Brush. To create the roll, pull the hair from the nape to the crown then roll like a sausage (you can also place some hair stuffing to create more of a bump). Once rolled, pin and secure the hair with a fringe pin in silver so they couldn’t be seen. Then pull the sides up, wrapping them around and tucking them in like a French roll. Once the style is set in place, put some O&M Frizzy Logic Shine Serum onto a tint brush and paint onto their hair to create a shiny almost wet look effect.

Julia Roberts Hair Color Formula

julia-roberts-hair-color-golden-globe

Source: People Magazine/Steve Granitz/WireImage

COLOR

To achieve this hair color on Julia Roberts, paint the new growth and melt out about an inch using Oway Hcolor 6.0 Natural Dark Blonde and Oway Hcatalyst 20 Volume Cream Developer. Then, add face framing highlights and lift with Oway Hbleach Butter Cream Lightener to a level 9 pairing with Oway Hcatalyst 40 Volume Cream Developer. 

Color the remaining hair with 25g of Oway Hcolor 9.3 Golden Very Light Blonde and 5 g of Oway Hcolor 9.43 Copper Golden Very Light Blonde and Oway Htone 9 Volume Cream Developer.

Once processed, shampoo with Oway Hbalance Post-Color Neutralizing Shampoo and condition with the Oway Hbalance Post-Color pH Mask to restore the hair’s natural pH. Towel dry and mist the hair with Oway Hrestore Protein Treatment Spray, which will add natural protein, evening the porosity of the hair. Then, glaze over the hair with the Oway HNectar Color treatment Oway Hnectar 10.32 Caramel Extra Light Blonde and Oway Htone 9 Volume Cream Developer. This will add shine, condition the hair and seal the color.

STYLE

Prep damp hair with an Oway Glossy Nectar and Oway Flux Potion cocktail to reduce frizz and help hold the overall style while reducing hair breakage during the drying process. Once the hair is blown out, mist the Oway Thermal Stress Protector and curl with your preferred iron. Start wrapping the hair from the eye down. Brush the curls out into a wave pattern once the hair cools. Finish with the Oway Sculpting Mist to set style.

Jamie Lee Curtis Hair Color Formula

COLOR

To re-create Jamie Lee Curtis’ hair color, lighten the hair out past pale yellow using the Oway Hbleach Butter Cream Lightener and Oway Hcatalyst 40 Volume Cream Developer. Tone with Oway Hcolor 90.11 Intense Ash Super Bleaching Blonde and Oway Htone 9 Volume Cream Developer. After your color has processed, shampoo the hair with the Oway Silver Steel Hair Bath, which will additionally reduce the yellow from the hair and condition with Oway Color Protection Hair Mask. Towel dry the hair and spray the entire hair with Oway Color Protection Veil to prevent color from fading. To maintain this color, remove any unwanted warm tones using the Oway Silver Steel Shampoo at home once a week.

jamie-lee-curtis-hair-color-golden-globes

Source: People Magazine/Daniele Venturelli/WireImage

STYLE

Prep the root area on damp hair with the Oway Volumizing Root Spray and blow-dry texture up into the hair. Finish with the Oway Shaping Putty twisting and polishing the hair into shape.

Emily Blunt Hair Color Formula

emily-blunt-hair-style-golden-globes

Source: People Magazine/Frazer Harrison/Getty/Laini Reeves

COLOR

Highlight the hair with small babylights using the Oway Hbleach Butter Cream Lightener and Oway Hcatalyst 30 Volume Cream Developer. Spice up the remaining hair fabric with Oway Hcolor 6.35 BST Tobacco Dark Blonde and Oway Htone 9 Volume Cream Developer. Complete the color using Oway Hnectar 10.21 Extra Light Lavender Blonde and Oway Htone 9 Volume Cream Developer after the hair has lifted.

STYLE

Blowdry with the Oway Flux Potion and a drop of the Oway Nurturing Drops to create volume, texture and thermal protection. This cocktail will also nourish and seal the ends while speeding up your blowdrying time.

Then after the hair is dry, use Oway Plant & Mineral Refresh as a dry shampoo, adding more texture for the braid you will be creating. Using a center part, fishtail braid from front right to middle back, and then repeat on left side. Leave a few small pieces out around the face to frame and detail the face. Use bobby pins to tuck and secure the braids in the back. To complete this style, use Oway Glamshine Cloud to add shine and control flyaways. Add hair accessories for additional bling. Don't forget to spray the hair with Oway Sculpting Mist to hold style in place for your fun evening out.


from Simply Organic Beauty http://bit.ly/2Fl2gz3

Thursday, January 10, 2019

5 Healthy Habits Every Hair Stylist Should Practice

For many people, the New Year is a symbol of positivity and renewal. Everyone wants to be healthier and happier for their New Year’s resolution, but many end up falling back to the same place they were after a few weeks.

The secret: CONSISTENCY. Doing things consistently will help you develop the right habits, and when you do them long enough, these habits will eventually become part of you without even realizing it.

The same thing applies to work. As hair stylists, we use our bodies all day and come across people with different energies. But we come to accept this as “normal” that we tend to forget about our own well-being, eventually wearing us down.

This 2019, start the year right by investing in YOU FIRST. Check out our tips on how to elevate your body and mind through daily habits and rituals.

Healthy Habits Hair Stylists Should Practice

10-Minute Mindful Meditation

A quick 10-minute meditation can make all the difference in your mental health. You can do it before you start your day, in between client appointments or at the end of the day when you want to let go of all the stress and negative energy.

meditation-for-hair-stylists

Meditation Step-by-Step

  • Get a timer and set it to 10 minutes.
  • Find a comfortable, seated position and keep your back straight.
  • Relax your shoulders. Then, close your eyes.
  • Next, relax your face, bringing your attention to your breath. Let the natural rhythm of your breath flow.
  • If you mind begins to wander, slowly bring your attention back to your breath.
  • Practice for 10 minutes.

Yoga Poses for Hairdressers

As hairdressers, we put a lot of strains on our hands, shoulders and lower back. In fact, some of the top health issues many hair stylists face​​​​ as they work in the profession are musculoskeletal disorders, such as Carpal Tunnel Syndrome and Upper and Lower Back Pain.

These Yoga Poses will help strengthen your body and prevent ailments.

Wrists

  • Begin by making a fist. Then, circle your fists away from you.
  • Next, circle your fists towards your chest.
  • Do this five times each way for about 30 seconds.

Hands

  • Extend the right arm in front of you, with fingertips pointing to the ceiling.
  • Grab a hold of those fingertips, then gently press down.
  • Do this for five breaths on each hand and repeat as desired.
  • Do the same exercise again but with fingertips pointing down towards the floor.
  • Repeat as long as you need to.
wrist-exercise-for-hair-stylists
hand-exercise-for-hair-stylists

Shoulders

  • Place your hands on your shoulders and make big circles with your elbows. Repeat 10 times.
  • Then, go to the opposite direction. Repeat 10 times.
  • Next, extend your arms to the opposite sides.
  • Bend your elbows, hugging the right arm towards you. Hold for five breaths.
  • Repeat the exercise on the other arm. Repeat as needed.
  • Finally, take your right arm over your head, dropping it towards the back.
  • With your left hand, grab your right hand. You can also use a towel or a strap to hold on to.
  • Hold for 10 breaths, then repeat on the other side.
shoulder-exercise-for-hair-stylists
arm-exercise-for-hair-stylists

Lower Back

EXERCISE 1

  • Go into a seated position. Come to the edge of your seat.
  • Place your hand on your lap. Then begin to open up your chest and lengthen your neck.
  • Look up as you inhale. As you exhale, round your back, tucking your chin towards the chest.
  • Continue to do this flow for 10 breaths with rests in between.


EXERCISE 2

  • Next, bring your feet up on the chair. Bend your knees and hug them with your arms.
  • Drop the chin towards the chest.
  • Hold for about 10 breaths and repeat as needed.


EXERCISE 3

  • Finally, drop your upper body down.
  • Relax your shoulders and tuck your chin towards the chest.
  • Hold for five breaths and slowly rise up.
stretch-exercise-for-hair-stylists
lower-back-exercise-for-hair-stylists
spine-exercise-for-hair-stylists

Stay Hydrated!

As hair stylists, we can’t just survive on hairspray-laced coffee. Drinking the right amount of water will not only help you flush out toxins and maintain healthy skin, but it also greatly improves your brain function and energy levels.

In fact, studies have shown that the brain is strongly influenced by our hydration status. Mild dehydration (1-3% of body weight) can impair many aspects of brain function, including concentration and mood. In young women, for example, fluid loss of 1.36% after exercise causes drastic mood changes as well as increased frequency of headaches.

So how much water should you drink every day?

recommended-daily-water-intake

“Breakup” with Troublesome Clients & Toxic Salon Cultures

Hairdressers deal with people with different personalities all the time, and sometimes this can take a toll on our well-being. It is our belief that every situation can be approached with love and understanding but there are unique instances wherein it’s absolutely necessary to cut ties for the sake of our mental and emotional health.

When setting personal boundaries, the first step is to be mindful of the situation and your emotions. Nothing good arises from reacting emotionally. If anything, it will only cause more tension between you and your client or colleague. See where they are coming from and calmly explain your side. If the person persists with their toxic behavior, then it is best to let go.

This will not only improve your health, but it will also allow more space for more positivity to come into your life.

organic-essential-oils

Aromatherapy: Diffusing Essential Oils

We’ve all heard about the magic of essential oils, but are they really THAT powerful? Tons of research have proven the health benefits of Lavender, Rosemary, Citrus Fruits and Lemongrass. Essential oils are simply concentrated extracts of these plants and more.

When diffused, essential oils instantly elevate the mood at home and the salon. They are also proven natural stress relievers, energy boosters and focus enhancers.

Now that you have these 5 healthy habits, use them to create better, much-improved version of yourself this 2019.


from Simply Organic Beauty http://bit.ly/2CcxJj2

Friday, December 14, 2018

Trending Hair Colors This Week – Vol. 80

‘Tis the season for a new look! This week, we’re paying homage to the holidays’ most popular hair colors, courtesy of our #HolisticHairTribe.

See our picks below!

ppd-free-hair-color

Poinsettia Hair Color Formula

Hair by Miranda Kaye

Nothing says holidays like a deep, bold red. Can this hair color by Miranda Kay get any more perfect?

Roots: Equal Parts O&M CØR.color 6.4 Dark Copper Blonde + O&M CØR.color 6.43 Dark Copper Gold Blonde + 5g O&M CØR.color 0.43 Copper Pure Color with O&M CØR.color 5 vol Activator

Pulled Through Ends + Added 5g O&M CØR.color 0.43 Copper Pure Color

original-and-mineral-hair-color

White Christmas Hair Color Formula

Hair by Lexi Smith

Holiday hair doesn’t have to be all big, bold and bouncy. All you need is a fresh, beautiful color and luscious waves, and you’re ready to rock the town.

Formula 1: O&M CØR.color Platinum Toner + O&M CØR.color 5 vol Activator

Formula 2: O&M CØR.color Lilac Toner + O&M CØR.color 5 vol Activator

o&m-hair-color

Mulled Wine Hair Color Formula

Hair by M. Paige

Say goodbye to Merlot – Mulled Wine is officially this year’s designated holiday hair color. This festive hue comes in various shades but so far, this is our favorite.

Roots: 1/2 O&M CØR.color 55.55 Light Red Intense Brown + 1/2 O&M CØR.color 5.0 Light Brown with O&M CØR.color 20 vol Activator

Ends: 3/4 O&M CØR.color 7.0 Blonde + 1/4 O&M CØR.color 66.46 Dark Red Intense Blonde + dot O&M CØR.color 55.55 Light Red Intense Brown with O&M CØR.color 10 vol Activator

Processing Time: 40mins

ammonia-free-hair-color

Santa’s Suit Hair Color Formula

Hair by Chloe Malfitano

Chloe’s client’s natural level is a 7, ends included, with faded red hair color on it. To prepare her for the holidays, Chloe gave depth to her roots and brightened up her ends for some dimension.

Natural Level 7 with Faded Red

Roots: 1 oz O&M CØR.color 55.55 Light Red Intense Brown + 0.25 oz O&M CØR.color 5.6 Light Violet Brown with O&M CØR.color 10 vol Activator

Ends: O&M CØR.color 0.55 Red Pure Color with O&M CØR.color 5 vol Activator

oway-hair-color

Polar Blue Hair Color Formula

Hair by Kai Fujimoto

Reminiscent of icy winter days, this gorgeous fairy blue is the perfect hair color for clients who want to be anything but ordinary this season. To re-create this hue, use Kai’s formula below.

Pre-lightened with Oway Hbleach Butter Cream Lightener + Oway Hcatalyst 30 Volume Cream Developer

Roots: 20g Oway Hmilk No Stress Conditioning Treatment + 80 drops Oway Hmelt Blue Charm + 40 drops Oway Hmelt Mysterious Purple

Mid-ends:

Formula 1) 40g Oway Hcolor 11.17 Frosted Platinum + 40g Oway Htone 9 Volume Cream Developer + 80drops Oway Hmelt Mysterious Purple

Formula 2) 80g Oway Hmilk No Stress Conditioning Treatment + 40drops Oway Hmelt Blue Charm + 40drops Oway Hmelt Mysterious Purple

Processing Time: 30mins

resorcinol-free-hair-color

Copper Cones Hair Color Formula

Hair by Jess Rash

This season is all about embracing deep, bold looks. This multi-dimensional copper hair color by Jess definitely embodies that trend.

Formula 1: O&M CØR.color 55.55 Light Red Intense Brown with a ribbon of O&M CØR.color 4.0 Brown

Melting into Formula 2: O&M CØR.color 6.4 Dark Copper Blonde with a ribbon of O&M CØR.color 8.0 Light Blonde


from Simply Organic Beauty https://ift.tt/2CdtyEx

Thursday, December 13, 2018

How to Cover Resistant Greys in Under 30 Minutes

 “The color didn’t cover my greys.” These are probably the scariest words you’ll hear from a client. Resistant grey has always been a conundrum for many hairstylists, and for a variety of reasons, challenging to color.

Why Grey Hair is Resistant

So what makes grey hair so resistant to color? Sometimes it’s because the hair has so much product buildup that it has become impossible for color molecules to penetrate the hair cuticle. Residues from hair styling products and hard water minerals are just some of the common culprits. If the client is taking medications, it can also play a role.

Another reason is because grey hair is extremely hard hair. This means that grey hair has more layers of cuticle than pigmented hair, and those cuticle layers are very tightly packed down.

With the right tools and techniques, you’ll find that dealing with stubborn greys is not as difficult as many hairdressers in our field make it out to be.

Tips for Covering Resistant Greys

  • Before anything else, know the true percentage of grey hair present to determine your formula. Many people find that dropping down a half to a full level when formulating allows for ample pigment weight and better color deposit.
  • Clarify. Oway Htech Pre-Color Clarifying Shampoo is highly effective in removing all impurities and residues that can block hair color molecules from penetrating the hair shaft.
  • Use Malibu Crystal Gel if the client has hardwater at home or uses medication. It’s a powerful demineralizer that prepares the hair for technical services by removing minerals and oxidizers such as iron, lime, copper and even chlorine.
oway-hypercolor
  • Pre-softening the hair is a technique used by many hairstylists for coarse grey hair. It involves applying just the color directly on the hair with no developer, letting it sit for a few minutes. Then, mix your formula and paint over previously applied hair.
  • Add Oway Hypercolor to your formula. Oway Hypercolor is a process accelerator oil that helps speed up processing time and improves grey coverage. Its formula contains 10 precious organic oils that encapsulate the hair color pigments in your formula, protecting them from premature oxidation while strengthening their wetting capacity. Because of this, pigments penetrate quickly and effectively into the cortex with the aid of low to medium heat. 

               BONUS: This process shaves off up to 75% of the normal processing time.

How to Cover Grey

Watch the video below for the step-by-step tutorial:

1. To determine the amount of Hypercolor drops needed, establish the formula (Oway Hcolor + Hcatalyst) to be used FIRST.
     Example: 30g of Hcolor + 30g Hcatalyst = 60g Total Mixture

    Then, divide the total amount of the mixture by 6. This will give you the proper number of the Oway Hypercolor Drops you need.

     Example: 60g Total Mixture / 6 = 10 Hypercolor Drops

2. Add Oway Hcolor into the bowl. Then, mix with Oway Hypercolor Drops PRIOR to adding the Oway Hcatalyst.

3. Next, add Oway Hcatalyst Developer.

    PRO TIP: Prior to adding the Hcatalyst to the bowl, massage the bag to ensure the precious essential oils and butters in the developer stay blended.

4. Mix the entire formula thoroughly with a whisk.

5. Section the hair and apply the Oway Hcolor formula to the new growth.

    PRO TIP: Ensure proper saturation of product by applying to thin sections.

6. Punch 12-15 holes in a plastic cap, then place over the hair.

7. Put the hair under a warm dryer.  Wait for 15 minutes, then allow 5 additional minutes to cool.

    PRO TIP: For clients with no grey, place under a warm dryer for 10 minutes, and 5 minutes to cool.


from Simply Organic Beauty https://ift.tt/2Eu52Bw

Wednesday, December 12, 2018

How To Repair Decaying Logs in your Log Home


Are you looking at purchasing an older log home or does your current one have some rot and decay issues? No need to worry! The first thing to do is to figure out why the rot is present and fix that problem immediately to save yourself from future frustration.

As we all know, homes do get older with time and for that, there may be a greater or potential risk for log rot, especially if you live in a wet, and more humid climate. Generally, the logs with the greatest potential for rot and decay are the closest to the ground (or under the deck support posts), so the lower or second layer of your log wall where they can’t dry out well enough and are susceptible to soaking up more water in the ground.

While it’s not something that is as common, it is possible for large parts of logs to become rotten due to a number of underlying circumstances, at which point a full log replacement might be necessary.

Reasons why logs on your home may rot

There are many common reasons why logs start to decay here are some of the most common reasons:

  • The roof if not constructed properly and has a minimal overhang, which can result in rain drenching the logs.
  • Plants and trees outside your home that may be too close, as they can divert rainwater against the logs and this will leave the logs damp as there will be minimal sunlight allowing the logs to dry properly. This can include vegetable gardens or flower boxes holding moisture next to the walls of your home.
  • A leaky gutter or downspout that allows water to run down the logs.
  • A large crack on the up-facing part of the log that collects and holds rainwater and does not have proper drainage.
  • Paint used on the logs instead of a quality log home finish/stain.
  • Exterior faucets that are drilled through logs.
  • The porch is not attached to the bottom log instead of spaced properly to allow for water drainage.
  • Interior leaks and poor plumbing jobs.

More often than not, if the previous owners had properly maintained their log home, none of these problems would have occurred (or at least, very minimal). Here’s what you need to know when it comes to identifying if your logs are damaged by any of the above, what to extent, and some tips on how to fix or replace the decayed/rotten logs:

How to Identify the damaged logs and check the extent of your home’s damage

If it’s not already evident that you’ve got a rotting log there are other ways to check. When checking for log rot, your best and safest bet is to go around the home a hammer, tapping on each log you’re concerned about (note – hit the log itself not inside the grooves and crevices). How will you know if you’ve found a damaged spot? You’ll know as soon as you come in contact with the log and you feel a soft spot; a log should be hard and sturdy when hit.

If you do happen to find some soft spots, those can easily be treated and stopped from spreading, but from time to time you may find a log that has more substantial damage. In this case, you’ll have to replace the entire log, rather than just treating the area that’s affected. While this sounds like a major repair and undertaking, many homeowners are able to replace rotten logs themselves. If you’re not comfortable replacing it yourself, you can always call a professional, who will be able to fix the issue for you.

How to fixing or replace decaying or rotten logs on your home

Minor Rot Damage

This damage is considered superficial and may only penetrate the log surface up to 2 inches. If your house has signs of minor rot damage you need to first and foremost fix the cause then remove the rotten area using a chisel. Once you’ve been able to remove the rotten wood, you can either sand the area smooth and restain, or if the area is slightly too deep you are able to use a product such as E-Wood by Permachink.

This product is a two-part exproxy that can be shaped while still soft and can be nailed sawn drilled painted etc. when cured. Once dry, you can sand and stain just the wood of your existing logs!

Major Rot Damage

If you come across some major rot damage when inspecting your home or if you’re looking at purchasing an older one, you’ll typically find that this occurs when logs have been exposed to continuous moisture for many years. First things first, you need to fix the cause of the issue, which could be a number of things such as leaky gutters and downpipes, improperly installed base flashing, splashing water due to sidewalks or gardens being located to close to your logs. Once you have fixed the cause its time for log home surgery if you will!

Typically this sort of work is left to professionals with many years of log home restoration experience since removing an entire rotten section can be a bit of a tricky and lengthy process. Keep in mind when removing the lower logs of a house, you must ensure the rest of the logs above stay where they are by using jacks and shoring. Once the rotten piece(s) have been removed, a new log of very similar size and shape and same species of wood will then go in as its replacement. Often this is a very technical job especially if it involves the corner of your log home. Finally, after the new logs have been installed, make sure to stain them as soon as possible to help avoid any discoloration or decay.

Some of these fixes are easy and some may require a professional but it’s very important to make sure the conditions that promoted the rot in the first place are corrected before you try to restore your logs. You can avoid many of these costly structural issues and preventing rot from occurring by sticking to a yearly maintenance schedule and taking the proper steps to ensure the longevity of your home. Please see our article about log home maintenance for more information.

Do you think you may have decaying logs in your log home? Need a professional to come look at your log home? Or are you wanting more information on designing your very own log or timber home, or have additional questions? Send us an email at info@artisanlog.com and we would be able to answer any questions you have.


from Artisan Custom Log Homes https://ift.tt/2zVwfZT

Friday, December 7, 2018

Trending Hair Colors This Week – Vol. 79

Warm brunettes and coppers may be ruling the season, but there’s a color that’s getting some love from the Internet lately – Peach. So, we decided to dedicate the week to this pretty paint and search the #HolisticHairTribe community for inspiration.

Check out our favorites below!

ammonia-free-hair-color

Peach Mango Pie Hair Color Formula

Hair by Julia Lennartsson

Peach hair colors can be tricky to execute. But with the right formula, you can re-create this hair color with no problem.

Roots: O&M CØR.color 7.4 Copper Blonde + O&M CØR.color 7.0 Blonde with O&M CØR.color 10 vol Activator

Mids + Ends: 40g O&M CØR.color 8.43 Light Copper Gold Blonde + 10g O&M CØR.color 0.43 Copper Pure Color with O&M CØR.color 20 vol Activator

ppd-free-hair-color

Peaches & Cream Hair Color Formula

Hair by Julia Lennartsson

When we think about Peaches & Cream, we think about soft, fluffy texture. Doesn’t this hair color remind you exactly of this famous dessert?

Pre-bleached: O&M Pearl Blue Lightener to a Level 10

Toner: 20g O&M CØR.color 9.5 Very Light Red Blonde + 10g O&M CØR.color 9.7 Very Light Brunette Blonde + 10g O&M CØR.color Pale Pink Toner + 3g O&M CØR.color 0.43 Copper Pure Color with O&M CØR.color 5 vol Activator

resorcinol-free-hair-color

Strawberry Peach Sorbet Hair Color Formula

Hair by Amanda Kupari

With our O&M COR Pastel Toners, you can now easily recreate this beautiful hair color by Amanda. With Coral being the Color of the Year for 2019, it’s a must to stock up on these toners.

Color: 20g O&M CØR.color Pale Pink Toner + 20g O&M CØR.color 5 vol Activator + 5g O&M CØR.color Apricot Toner with O&M CØR.color 5 vol Activator

oway-hair-color

Peach Tart Hair Color Formula

Hair by Evelyne of Moda Capelli

Don’t you just love this Copper Melt with a hint of peachy tone? Everything about this hair color by Evelyne screams Fall.

Base: Equal Parts Oway Hcolor 7.44 Deep Coppery Blonde + Oway Hcolor 8.34 Golden Copper Light Blonde with 15vol

Gloss with Leftover Color

oway-hair-stylist

Gingersnaps Hair Color Formula

Hair by Molly Kuhl

This client had balayage previously, so all Molly had to do was to touch it up and gloss with the formula. Look how beautiful it turned out!

Open Air Balayage: Oway Hbleach Butter Cream Lightener + Oway Hcatalyst 40 Volume Cream Developer

Full Length at Roots: Half Oway Hcolor 8.34 Golden Copper Light Blonde + Oway Hcolor 9.43 Copper Golden Very Light Blonde with Oway Htone 9 Volume Cream Developer

Water down with Oway Hmilk No Stress Conditioning Treatment

Mids: 1/3 of Remaining Mixture + Oway Hmilk No Stress Conditioning Treatment

Ends: ½ Oway Hmilk No Stress Conditioning Treatment + ½ Remaining Mixture

organic-hair-color

Cinnamon Scones Hair Color Formula

Hair by Kristina Fetto

Pumpkin Spice. Gingersnaps. Whatever you call this hair color, there’s no denying the amount of talent and skill put into creating these gorgeous tones.

Partial Foilyage (Roots): Oway Hcolor 4.0 Natural Brown

Toner: 10g Oway Hnectar 8.32 Light Caramel Blonde + 3g Oway Hcolor 8.4 Coppery Light Blonde with Oway Htone 9 Volume Cream Developer for 10mins


from Simply Organic Beauty https://ift.tt/2UmJJGZ

Friday, November 30, 2018

Quick & Easy Holiday Hair Updos to Try ASAP

The holidays are the most nerve-wracking season for many hairdressers: holiday parties left and right; tourists coming from everywhere; last-minute cancellations and bookings for holiday hairdos, among other things. From all this chaos, it can be challenging to instantly come up with a hair style that's both quick and stylish.

So today, we did 3 elegant 'dos that will allow you to re-create them in the salon in no-time, using our Oway and Original & Mineral Holiday Hair Kits.

Easy Holiday Hair Styles

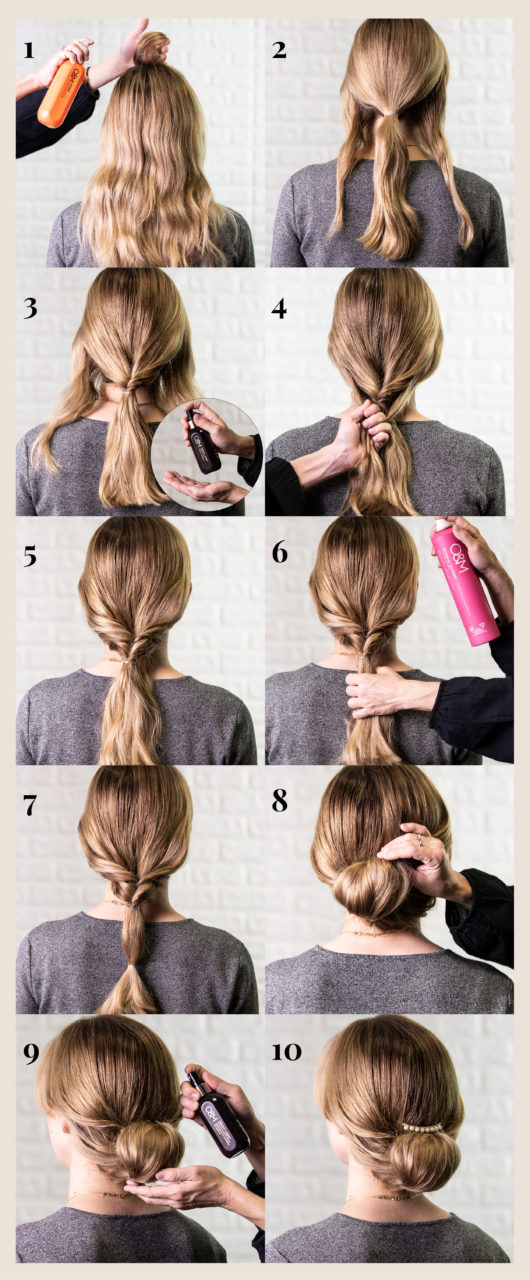
Low Bun Updo Tutorial

STEP 1. Prep the hair with O&M Atonic Thickening Spray to add body to the hair.

STEP 2. Create a pony using an elastic, leaving a section of hair on the sides.

STEP 3. Apply a few drops of O&M Frizzy Logic Serum to smooth flyaways. Then, make a hole above the elastic and flip the pony through it.

STEP 4. Take the remaining sections and tie another pony, then flip it through the hole.

STEP 5. Spray with O&M Queenie Firm Hold Hair Spray to control texture and set.

STEP 6. Tie the two ponies together near the bottom of the section.

STEP 7. Flip the whole pony, tucking it securely into a bun using bobby pins.

STEP 8. Add more pins and spray with O&M Queenie once more to secure.

STEP 9. Spray with O&M Frizzy Logic Spray to tame flyaways and give the hair a soft shine.

STEP 10. Finish by adding an accent for an elegant touch.

holiday-hair-kit
elegant-low-bun-updo-tutorial

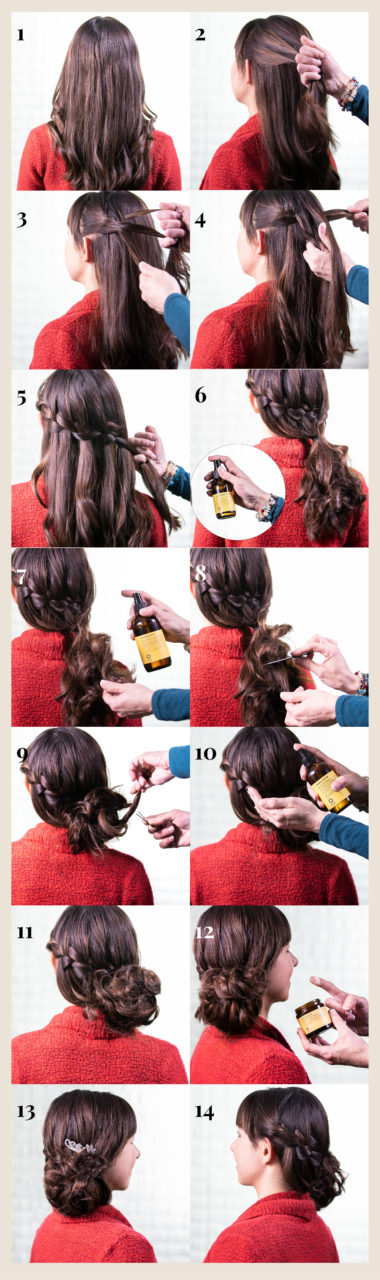
Waterfall Braided Bun Tutorial

waterfall-braided-bun-tutorial

STEP 1. Prep the hair with Oway Thermal Stress Protector prior to curling the ends.

STEP 2. To create a waterfall braid, begin by taking a large vertical section of hair from the front, and divide into three sections.

STEP 3. Cross the back section over the middle section, and then the front section over the middle.

STEP 4. Next, as you cross the back section over the middle for the second time, be sure to bring in a section of hair underneath to create a French braid.

STEP 5. Repeat this process until you reach the back opposite corner of the head.

STEP 6. Tie a pony with the remaining section of hair and spray with Oway Glamshine Cloud to tame flyaways.

STEP 7. Then, spray the hair with Oway Sculpting Mist to hold the style.

STEP 8. Back comb the pony to give the hair more body and texture.

STEP 9. Pin curled strands onto the side to create a low bun.

STEP 10. Finish by applying a few drops of Oway Glossy Nectar.

STEP 11. If necessary, secure the bun by adding more pins.

STEP 12. If your client has bangs, apply Oway Precious Wax to control the bangs.

STEP 9. Add a sparkly accent to finish the look.

holiday-hair-kit

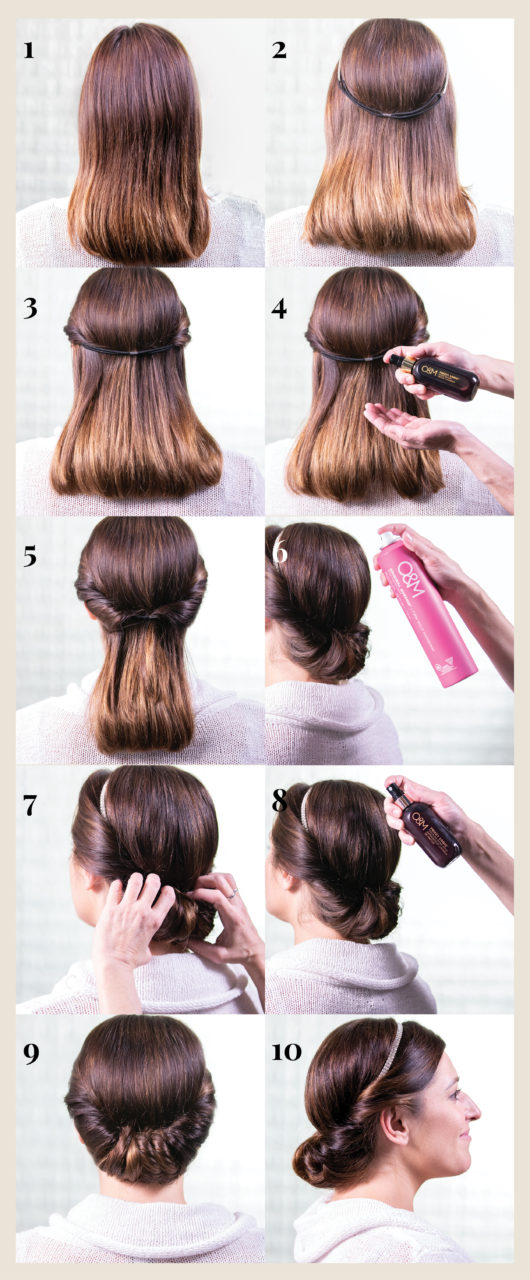
Headband Bun Tutorial

STEP 1. Comb the hair to smooth and detangle.

STEP 2. Take a headband and put it on top of the smoothed hair. 

STEP 3. Use the O&M Frizzy Logic Serum to tame any flyaways.

STEP 4. Take a section of hair on each side and tuck it in the headband. The thickness of sections determined by the desired final look and density of hair.

STEP 5. Continue tucking sections moving to the back, alternating sides each time for balance.

STEP 6. Spray with O&M Queenie Firm Hold Hair Spray to set the style. Center section: Make sure all pieces are neatly tucked for a balanced bun.

STEP 7. Secure the bun with extra pins if necessary.

STEP 8. Then apply O&M Frizzy Logic Spray to give the hair a soft sheen.

STEP 9. And voila! You're done!

holiday-hair-kit
headband-bun-tutorial

Which of these hair styles are you excited to try this season?


from Simply Organic Beauty https://ift.tt/2PbmhZt